Epoxy Floor Maintenance: The Complete Guide to Cleaning, Recoating & Repair
A well-maintained epoxy floor lasts 20+ years. A neglected one fails in 5. Here is every cleaning schedule, repair technique, and recoating signal you need to keep your installs looking new.
Why Maintenance Matters More Than the Install
10–20+ yrs
Maintained Lifespan
With proper cleaning and recoat schedule
3–5 yrs
Neglected Lifespan
No cleaning routine, no recoat
$2–4/sq ft
Recoat Cost
vs $7–18/sq ft for full strip and redo
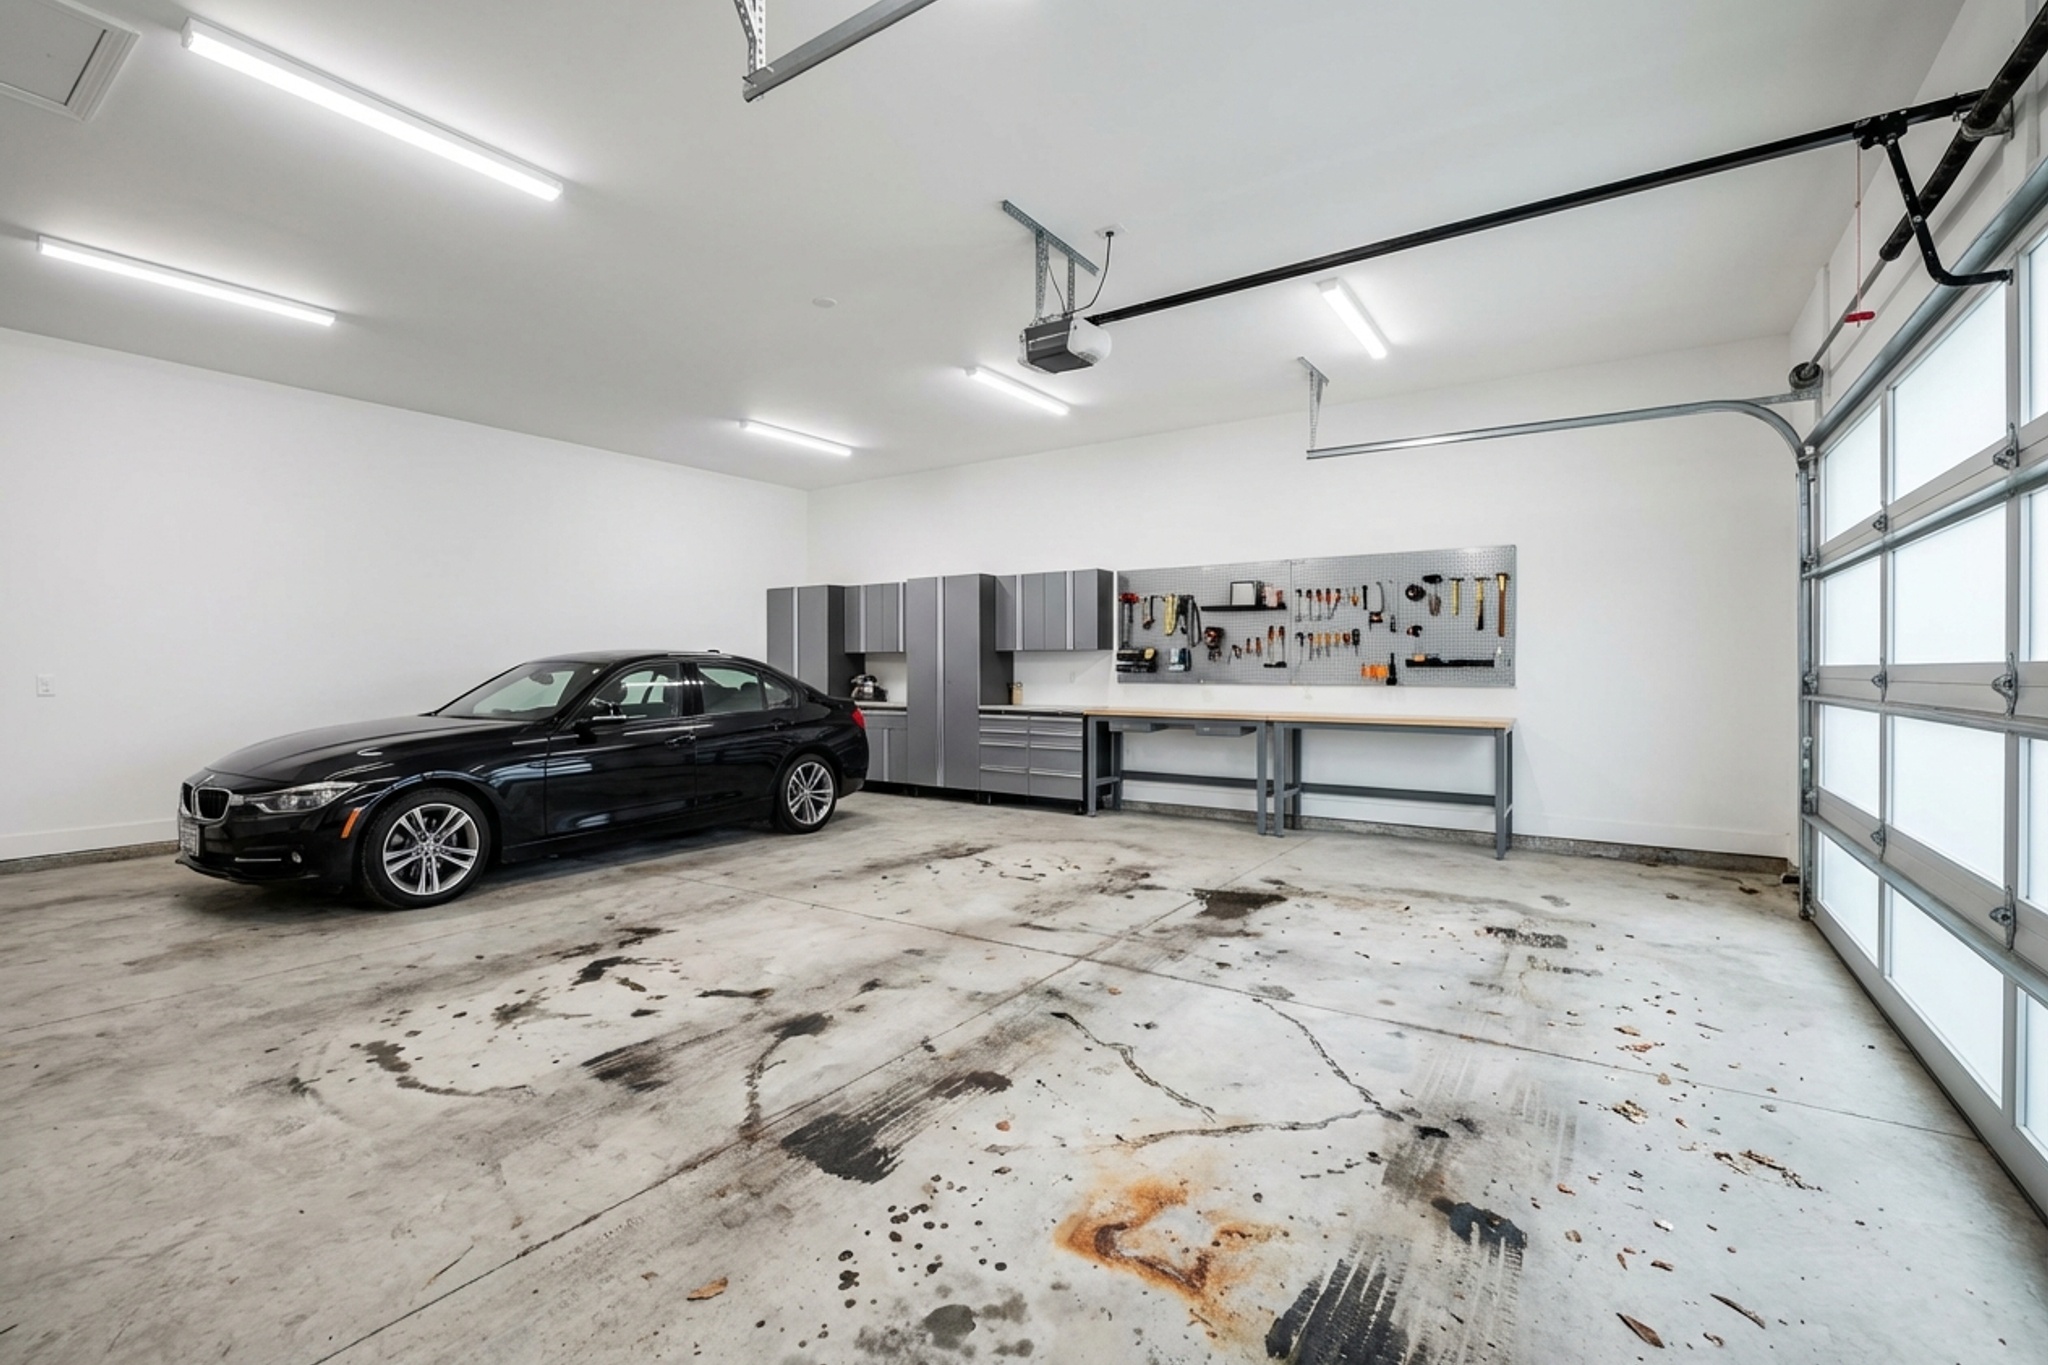
You can install a perfect floor. Diamond-ground prep, professional-grade 100% solids epoxy, polyaspartic topcoat. Every step by the book. And if the owner parks on it for ten years without ever sweeping or mopping, that floor will look like it was installed by an amateur.
Dirt and grit act like sandpaper under foot traffic and tires. Chemical spills eat through the topcoat when left sitting. Road salt from winter driving pulls moisture into micro-scratches and accelerates wear. None of this is the coating failing. It is the maintenance failing.
The good news is that epoxy is one of the easiest floor surfaces to maintain. A consistent routine takes 15 minutes a week for a residential garage and protects the topcoat investment for the full expected lifespan. The bad news is that most homeowners do not know this until the damage is done.
Margin Insight
Hand every client a one-page maintenance sheet at final walkthrough. Contractors who do this report fewer callbacks and more referrals. A client whose floor still looks perfect three years later is a client who recommends you to their neighbors. That one sheet of paper pays for itself many times over.
Daily and Weekly Cleaning
The single best thing you can do for an epoxy floor is keep loose grit off it. Sand, dirt, and small debris get ground into the topcoat under foot traffic and tires. Over months, that grinding action dulls the gloss and creates fine scratches that trap more dirt. A two-minute sweep breaks that cycle.
Daily: Sweep or Dust Mop
Use a soft-bristle push broom or a microfiber dust mop. Run it across the entire floor to collect loose dirt, leaves, and debris. In a residential garage, this takes about two minutes. In a commercial space with constant foot traffic, sweep at the end of every shift. That is the whole daily routine.
Warning
Never use a wire-bristle broom or stiff industrial broom on epoxy. The hard bristles scratch the topcoat and leave marks that are visible under overhead lighting. A $12 soft-bristle broom from any hardware store is the right tool.
Weekly: Damp Mop
Once a week, mop the floor with warm water and a pH-neutral cleaner. The goal is to dissolve anything that sweeping missed: tire marks, light grease spots, spilled drinks, shoe scuffs. Wring the mop well. You want damp, not soaking. Excess water pooling on epoxy is not harmful to the coating itself, but it creates a slip hazard and leaves water spots as it dries.
Recommended Cleaners
- Simple Green All-Purpose Cleaner (diluted per label). The go-to for residential epoxy floors. pH-neutral, cuts grease, leaves no residue.
- Zep Neutral pH Floor Cleaner. Commercial-grade option that works on all coating types without dulling the surface.
- Clear ammonia and water (5 oz ammonia per gallon of hot water). Old-school contractor method. Cuts through oil and grease effectively and evaporates clean.
- A few drops of Dawn dish soap in a gallon of warm water. Works in a pinch for light cleaning but use sparingly. Soap-based cleaners can leave a film if overused.
What to Avoid
- Vinegar or any acidic cleaner. Acid eats into epoxy over time, dulling the gloss and eventually softening the topcoat.
- Citrus-based cleaners (Orange Glo, Citra Solv). The citric acid degrades the coating. People assume "natural" means gentle. On epoxy, it does not.
- Pine-Sol. Leaves a waxy residue that builds up over time and dulls the floor.
- Undiluted bleach. Discolors pigmented coatings and can soften the topcoat with repeated use.
- Magic Erasers or melamine sponges. They are micro-abrasives. They will scratch and dull the surface.
- Steel wool or abrasive scrub pads. Same problem, worse results.
Pro Tip
For garages that see a lot of tire traffic, a foam mop outperforms string mops. Foam mops glide over the texture of flake and quartz systems without snagging, and they rinse cleaner between passes. The Libman Wonder Mop or any flat foam mop works well.
Monthly and Seasonal Maintenance
Weekly mopping handles routine dirt. Monthly deep cleans tackle the buildup that light mopping misses: embedded tire marks, grease haze in work areas, and that thin film of grime that accumulates slowly enough that you do not notice it until you clean a section and see the difference.
Monthly Deep Clean
Clear the floor completely
Move vehicles, storage bins, and mats. You cannot deep clean around obstacles. Dirt hides at edges and under objects.
Sweep thoroughly
Get all loose debris first. Deep cleaning on top of grit just grinds it into the surface.
Apply cleaning solution
Use Simple Green or Zep Neutral pH at the recommended dilution. Apply with a mop or pump sprayer and let it sit for 5-10 minutes. This dwell time lets the cleaner break down embedded grease and tire marks.
Scrub problem areas
Use a soft-bristle deck brush on stubborn spots. Work in circular motions. Do not press hard enough to scratch the topcoat. For tire marks that will not lift, try a nylon scrub pad with the cleaning solution.
Rinse and dry
Mop with clean water to remove all cleaner residue. Then squeegee or dry mop to prevent water spots. In a garage, you can open the door and let it air dry if you squeegee the bulk water out first.
Seasonal Considerations
Seasonal Maintenance Calendar
| Season | Key Concern | Action |
|---|---|---|
| Spring | Post-winter salt and grime buildup | Full deep clean with degreaser. Inspect for any salt damage or micro-cracks from freeze-thaw. |
| Summer | Hot tire marks, UV exposure near doors | Check tire track areas for softening. Clean tire marks promptly. Consider a UV-blocking mat near open garage doors. |
| Fall | Leaf debris, prep for winter | Deep clean before winter. Apply a thin coat of floor wax (optional, not required) for extra protection against salt. |
| Winter | Road salt, snowmelt, chemical tracking | Sweep salt and slush off the floor within 24 hours. Salt left sitting accelerates topcoat wear. |
Good to Know
Spring is inspection season. After a winter of salt, ice melt chemicals, and temperature swings, do a full walk of the floor under bright light. Look for dull patches, fine cracks, or spots where the topcoat is thinning. Catching wear early means a $2-4/sq ft recoat instead of an $7-18/sq ft strip and redo later.
Dealing with Stains and Chemical Spills
Epoxy resists most chemicals you will find in a garage or commercial space. That resistance is not unlimited. Every chemical has a contact window. Clean it up within that window and the floor is fine. Leave it past the window and you are looking at a stain, a soft spot, or a topcoat failure.
Chemical Resistance by Contact Time
| Chemical | Safe Contact Time | Damage If Left | Cleanup Method |
|---|---|---|---|
| Motor oil / transmission fluid | 48+ hours | Staining on light colors | Wipe up, mop with degreaser |
| Brake fluid (DOT 3/4) | 2-4 hours | Softens topcoat, creates dull spot | Blot immediately, clean with ammonia solution |
| Gasoline | 1-2 hours | Softens and discolors epoxy | Absorb with cat litter, then clean with degreaser |
| Antifreeze / coolant | 24+ hours | Staining (green/orange color) | Wipe up, mop with warm water |
| Battery acid (sulfuric) | 15-30 minutes | Etches and discolors topcoat | Neutralize with baking soda, flush with water immediately |
| Acetone / MEK | 5-10 minutes | Dissolves epoxy topcoat | Blot immediately, do not rub. Ventilate area. |
| Bleach (undiluted) | 30-60 minutes | Discoloration and softening | Dilute with water, mop clean |
| Road salt / ice melt | 24-48 hours | Micro-scratching and dull spots | Sweep dry, then mop with warm water |
| Hydraulic fluid | 4-8 hours | Staining and softening | Absorb with kitty litter, degrease |
The pattern is straightforward. Petroleum products (oil, antifreeze, hydraulic fluid) mainly cause staining but do not damage the coating itself. Solvents (acetone, MEK, xylene, lacquer thinner) are the real threat. They dissolve epoxy. If a solvent spills, you have minutes, not hours.
Warning
Battery acid is the silent killer of garage epoxy. Batteries vent small amounts of sulfuric acid during charging. If a client charges a car battery on the floor regularly, suggest a rubber charging mat under the battery. One leaking cell can etch a permanent mark into the topcoat overnight.
Removing Set-In Stains
- 1Make a paste of baking soda and water. Apply it to the stain and let it sit for 20-30 minutes.
- 2Scrub gently with a nylon pad or soft-bristle brush.
- 3Rinse with clean water and inspect. Most oil and grease stains lift on the first attempt.
- 4For stubborn stains, try a poultice of acetone on a rag laid over the stain for 60 seconds. Do not let acetone pool or sit longer than needed.
- 5If the stain has penetrated the topcoat and reached the base coat, spot repair is the only fix. See the chip and scratch repair section below.
When to Recoat (and When to Start Over)
Recoating is the single most cost-effective thing you can do to extend the life of an epoxy floor system. The topcoat is the wear layer. It takes all the abrasion, UV, and chemical exposure so the base coat and epoxy bond do not have to. When the topcoat wears thin, recoating it restores the protection without touching the base coat underneath.
5–7 yrs
Residential Recoat Interval
Garage with 1-2 vehicles
3–5 yrs
Commercial Recoat Interval
Warehouse, shop, showroom
$2–4/sq ft
Recoat Cost
Scuff, clean, and topcoat
Signs the Topcoat Is Wearing
- Gloss fading. The floor looked wet and reflective when new. Now it looks flat, especially in high-traffic lanes and tire tracks.
- Scratches that will not clean out. Surface scratches from daily use are normal. When cleaning no longer removes them, the topcoat is thinning.
- Color showing through in traffic areas. If you can see the base coat color or flake chips losing their topcoat coverage, the wear layer is gone in that spot.
- Water no longer beads. Fresh topcoat makes water bead up. When water sheets flat instead, the surface energy has changed and the coating is wearing.
- Stains setting in faster. A healthy topcoat resists stains for hours. When oil or grease starts staining within minutes, the barrier is compromised.
Recoat vs Full Strip and Redo
Recoat vs Full Redo Cost Comparison
| Factor | Recoat | Full Strip & Redo |
|---|---|---|
| Cost per sq ft | $2-4 | $7-18 |
| 2-car garage (450 sq ft) | $900-1,800 | $3,150-8,100 |
| Downtime | 1-2 days | 3-5 days |
| Process | Scuff sand, clean, apply topcoat | Grind off old coating, re-prep, full system install |
| When appropriate | Base coat still bonded, no peeling | Peeling, delamination, moisture issues |
| Expected lifespan after | 5-7 more years | 10-20 years (full reset) |
The decision point is simple. If the base coat is still well-bonded to the concrete and the coating is not peeling or bubbling, recoat. You are just refreshing the wear layer. If the base coat is lifting, delaminating, or there is moisture pushing up from below, a recoat will not fix the underlying problem. You need to strip to bare concrete and start fresh.
Margin Insight
Recoating is a high-margin service for contractors. Material cost for a polyaspartic topcoat runs about $0.75-1.50/sq ft. A 450 sq ft garage recoat at $3/sq ft = $1,350 revenue. Material: ~$500. Labor (1 person, half day): ~$300. Profit: $550. You can fit two recoats into a single day. That is solid recurring revenue from your existing client base.
The Recoat Process
Scuff the existing surface
Use a floor buffer with a 120-150 grit screen or a light diamond pass. You need mechanical tooth for the new topcoat to grip. Do not grind through to the base coat.
Clean and degrease
Sweep all dust, then mop with ammonia solution or a dedicated floor prep cleaner. Any grease, oil, or contaminant left on the surface will cause the new topcoat to fish-eye or delaminate.
Apply the new topcoat
Roll a polyaspartic or polyurethane topcoat at 5-8 mils wet film thickness. Two thin coats outperform one thick coat for adhesion and leveling. Follow the manufacturer recoat window between coats.
Cure and return to service
Polyaspartic: foot traffic in 4-6 hours, vehicles in 24 hours. Polyurethane: foot traffic in 12 hours, vehicles in 48 hours.
Repairing Chips and Scratches
Dropped tools, dragged equipment, and impact damage happen on every floor eventually. Small chips and scratches are not a sign that the coating failed. They are normal wear on a working surface. The key is fixing them before they spread.
Surface Scratches
Light scratches that catch the light but have not broken through the topcoat are cosmetic. On solid-color floors, they show more than on flake or quartz systems. In many cases, a monthly deep clean with a nylon scrub pad and cleaning solution will minimize their appearance. If the scratches are deeper and more widespread, a full recoat is the fix.
Chip Repair (DIY-Friendly)
Clean the damaged area
Remove any loose epoxy around the chip. Use a razor blade or putty knife to scrape away flaking material. Clean with acetone on a rag to remove grease and dust.
Lightly sand the surrounding area
Use 120-grit sandpaper to scuff the topcoat in a 3-4 inch radius around the chip. This gives the repair material something to grip.
Fill the chip
Mix a small batch of two-part epoxy (matching the original color if possible) and fill the chip level with the surrounding surface. For flake floors, press a few matching chips into the wet repair to blend the texture.
Let it cure completely
Follow the epoxy cure time on the label. Usually 12-24 hours. Do not rush this step.
Apply topcoat over the repair
Brush or roll a thin layer of clear topcoat (polyaspartic or polyurethane) over the filled area, feathering it 2-3 inches past the repair edges to blend.
Pro Tip
Keep a small jar of the original epoxy color and some matching flake chips from every install. Label it with the client name and date. When they call about a chip two years later, you have the exact color match on hand. This small habit saves hours of color-matching headaches and impresses clients.
When to Call a Pro
- Chips larger than a quarter or clusters of small chips in one area. Widespread chipping suggests an adhesion problem, not just impact damage.
- Cracks that run through the coating and into the concrete. The coating crack is a symptom. The concrete crack is the cause. Fill the concrete crack first, then repair the coating.
- Peeling or lifting at edges, joints, or around the chip. If the coating is pulling away from the concrete, spot repair will not hold. The area needs grinding and re-bonding.
- Any damage in a commercial or industrial space under warranty. Document and call the installer. DIY repair can void the warranty.
Spot Repair vs Full Recoat
Pros
- Fixes the damage for $20-50 in materials
- Takes 30 minutes plus cure time
- No need to clear the entire floor
- Good enough for isolated chips in garages
Cons
- Color match is rarely perfect, especially on sun-faded floors
- Repair edges can be visible under certain lighting
- Does not address overall topcoat wear
- Multiple spot repairs start to look patchy
Maintenance by Space Type
A garage floor, a commercial kitchen, and a basement rec room all have epoxy. They do not have the same wear patterns. The coating system might be similar, but what beats on it day after day is completely different. Your maintenance advice to clients should reflect that.
Residential Garage
- Primary threats: Hot tires, road salt, oil drips, dropped tools, rolling tool chests.
- Sweep 2-3 times per week. Mop weekly.
- Keep rubber mats under chemical storage areas and battery chargers.
- Salt is the #1 winter enemy. Sweep it off the floor the same day you track it in. Salt left overnight pulls moisture into micro-scratches.
- Recoat every 5-7 years for a 1-2 car residential garage.
Commercial and Industrial
- Primary threats: Forklift traffic, chemical spills, heavy foot traffic, pallet impacts, constant abrasion.
- Sweep daily. Scrub or auto-scrub weekly. Deep clean monthly.
- Use an auto-scrubber for spaces over 2,000 sq ft. Manual mopping that much space is not practical and does not clean as well.
- Chemical spill kits should be accessible at every work station. Speed of cleanup determines whether there is damage or not.
- Recoat every 3-5 years. High-traffic lanes (forklift paths, loading areas) may need spot recoating sooner.
- Inspect floor drains and perimeter joints quarterly. These are the first places coatings fail in industrial settings.
Basement
- Primary threats: Moisture from below, furniture scratches, low airflow trapping humidity.
- Moisture is the big one. Basements without vapor barriers can transmit enough moisture through the slab to cause delamination over time.
- Run a dehumidifier if the basement stays above 60% relative humidity. Sustained high humidity softens some topcoats.
- Felt pads on all furniture legs. Basements see more furniture rearranging than garages, and dragging a couch across epoxy leaves marks.
- Sweep and mop every two weeks. Basements collect less dirt than garages but still need regular cleaning.
- Recoat every 7-10 years. Less traffic means longer intervals.
Good to Know
Commercial clients are your best maintenance revenue source. Set up annual or semi-annual recoating contracts for high-traffic commercial floors. A warehouse with 10,000 sq ft of epoxy needs lane recoating every 2-3 years. At $2-4/sq ft for the traffic lanes (usually 30-40% of total area), that is $6,000-16,000 in recurring revenue per client.
What NOT to Do: Mistakes That Destroy Epoxy Floors
Most epoxy floor damage is not caused by the environment. It is caused by the owner doing something well-intentioned but wrong. These are the mistakes that come up in contractor forums, callbacks, and warranty disputes more than anything else.
The Big Eight
- 1Using a pressure washer above 1,200 PSI. High-pressure water will blast through the topcoat and delaminate the base coat from the concrete. If you must pressure wash epoxy, stay under 1,200 PSI with a wide fan tip. A garden hose and mop is safer and usually sufficient.
- 2Letting road salt sit for days. Salt is hygroscopic. It pulls moisture out of the air and holds it against the floor surface. That constant wet-dry cycle in winter accelerates topcoat wear faster than anything else in a residential garage.
- 3Dragging heavy equipment across the floor. Jack stands, engine hoists, rolling tool boxes with metal casters. All of them gouge epoxy when dragged. Lift and place, or use rubber-wheeled dollies.
- 4Pouring boiling water to clean grease spots. Some people find this tip online and try it. Thermal shock can crack the topcoat and, in rare cases, delaminate the base coat. Warm water and degreaser work fine. Boiling is never needed.
- 5Waxing or polishing with automotive products. Turtle Wax, Meguiar's, and similar products build up a film that yellows, traps dirt, and creates an uneven surface. Epoxy topcoats do not need wax. They are already sealed.
- 6Ignoring small chips. One small chip is easy to fix. Ignoring it lets moisture and dirt get under the coating at the chip edge. Over months, the chip grows as the coating lifts around it. A $20 repair becomes a $200 repair.
- 7Using citrus or vinegar-based "green" cleaners. Marketing calls them safe and natural. The acid in citrus cleaners degrades epoxy topcoats with repeated use. pH-neutral cleaners are the only safe option for regular maintenance.
- 8Parking on a new floor too soon. The coating feels hard to the touch long before it reaches full cure. Driving on an epoxy floor before full cure compresses the coating under tire weight and can create permanent indentations. Follow the installer's cure schedule exactly.
Warning
The most common callback contractors report is a client who pressure-washed their epoxy garage floor "to get it really clean." A 3,000 PSI pressure washer will strip a topcoat in one pass. Put this on your maintenance sheet in bold: do not pressure wash above 1,200 PSI.
Every one of these mistakes is preventable with a 60-second conversation at the final walkthrough. Tell the client what not to do. Write it down. The five minutes you spend on that conversation saves hours of warranty work later.
Featured Materials
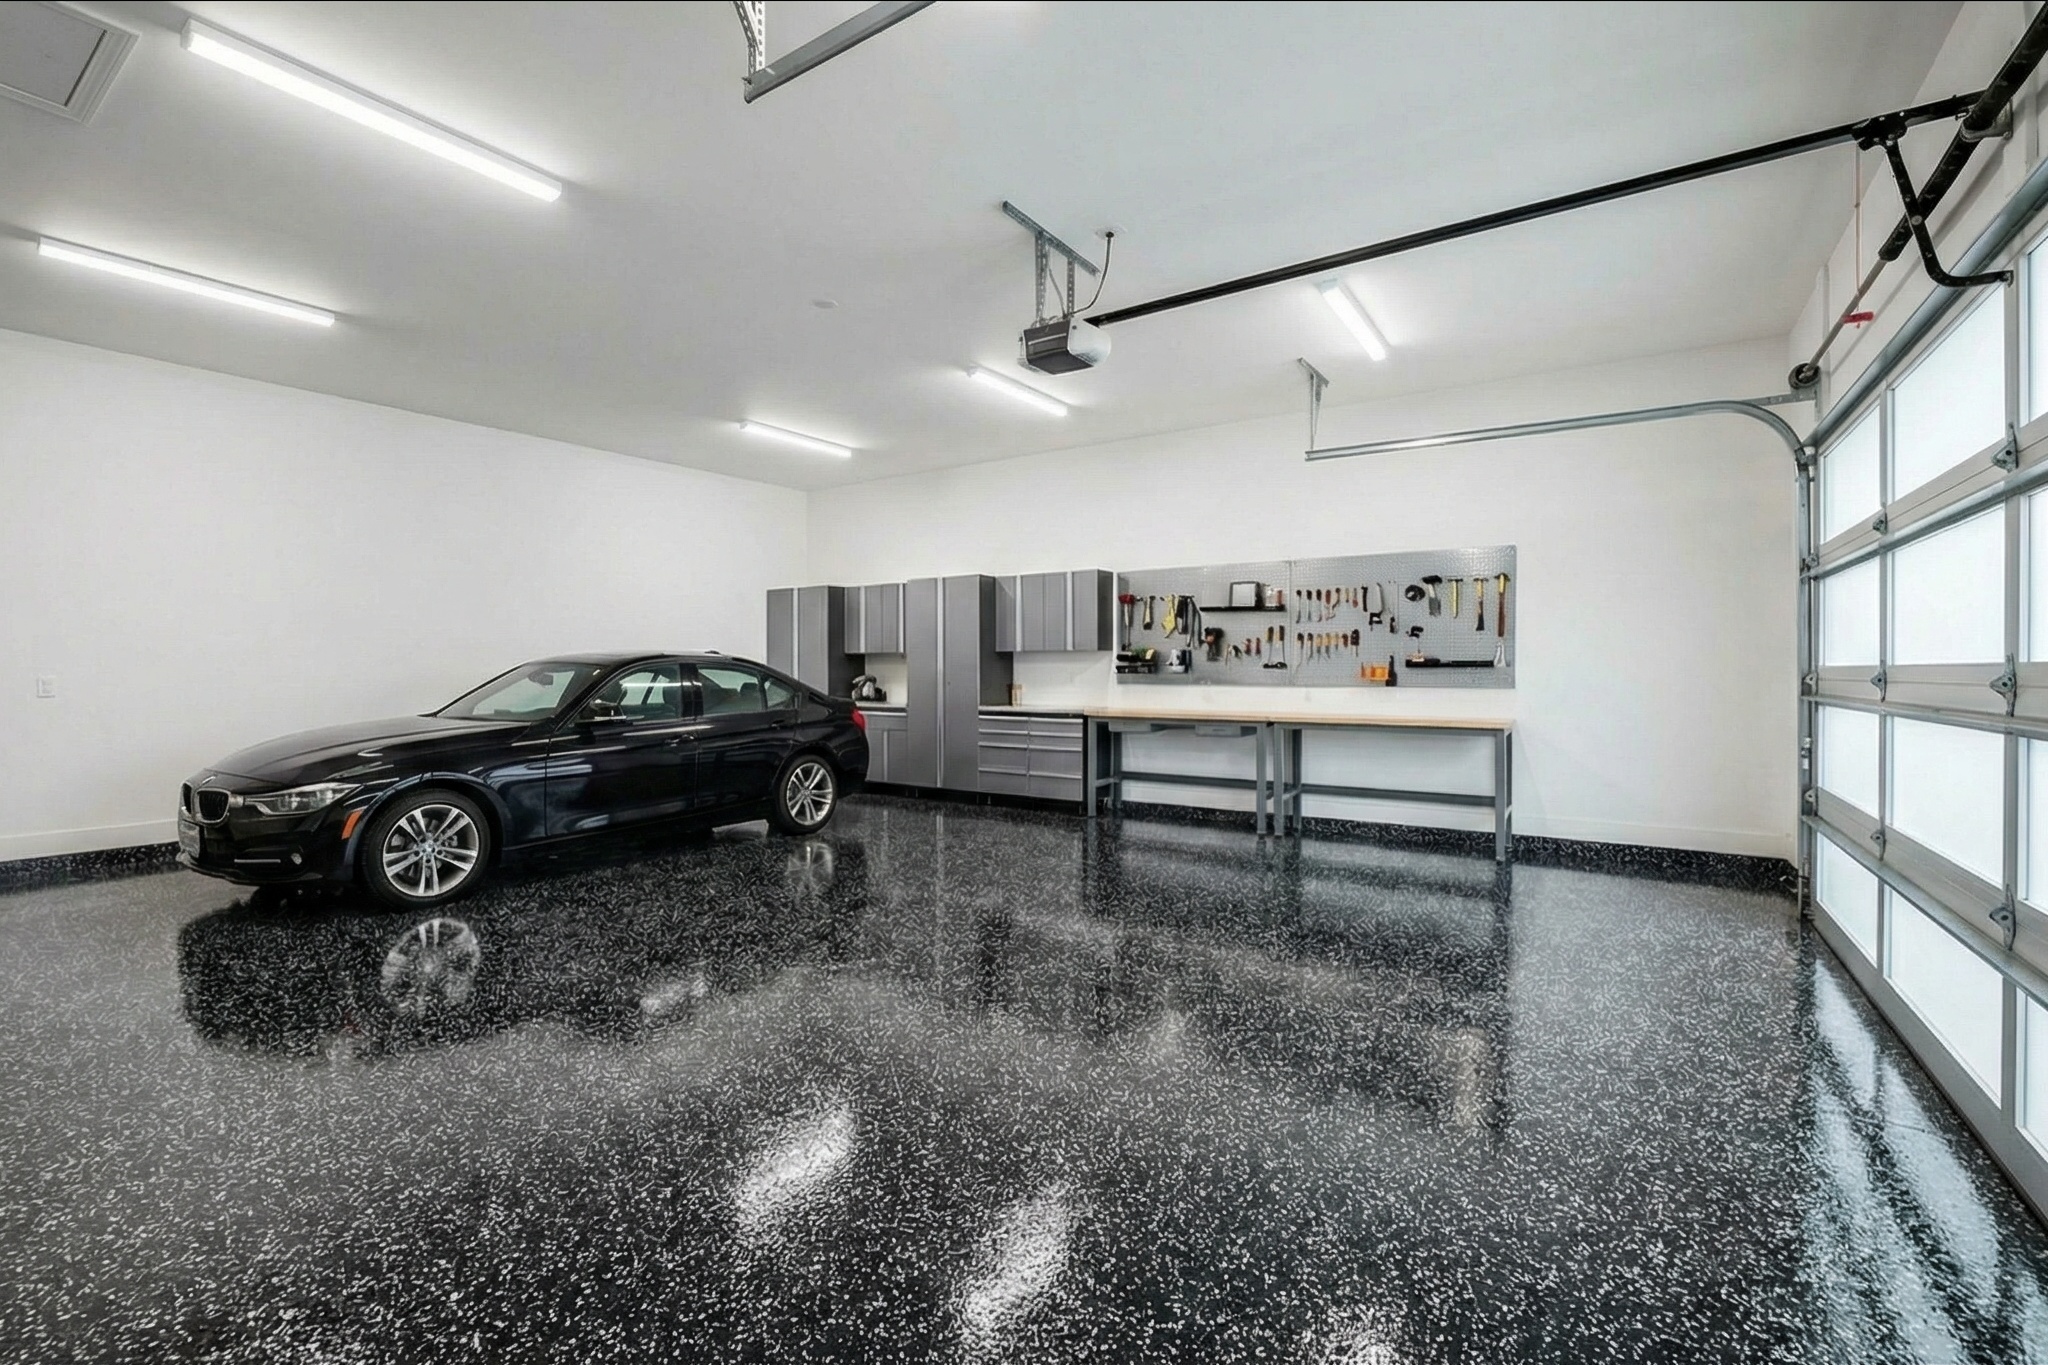
Flake Broadcast
Domino Flake
Black and gray chips on charcoal base. The #1 residential garage choice and the easiest flake system to maintain.
Solid Epoxy
Battleship Gray
Clean uniform gray. Shows dirt and tire marks more readily, so weekly mopping is non-negotiable.
Quartz Broadcast
Sandstone Quartz
Natural stone texture with excellent grip. The textured surface requires a scrub brush for deep cleans.
Metallic Epoxy
Copper Penny Metallic
Warm copper tones. Metallic finishes show scratches more than flake, making maintenance even more important.
Show Clients What Their Floor Could Look Like
Upload a photo of any space, choose a coating system, and generate a photorealistic floor visualization. The best maintenance starts with a professional install.